View attachment 16452
Yesterday was the day! With a wealth of confidence thanks to the photos and help I had received to date,
EASY: I pulled out and snapped open the large center mirror console by inserting my thumb under it.
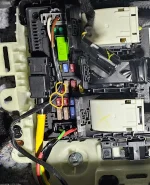
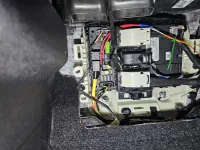
CUMBERSOME: It took about 15 minutes for me to figure out how to remove the wiring enclosure. As
@Sharbotcom had indicated, there is a latch at the bottom right of the housing. However, I suppose my fingers were too fat to get in there, press the latch and pull the two enclosures apart. I eventually was able to do it, however.
SEVERAL ATTEMPTS: Figuring out the wiretap was easy. Red to White and Black to Black. Problem was, the taps kept slipping out. It took several attempts and moving up to a thicker wiretap to finally get power to the radar detector. I secured the wires with electrical tape to prevent slippage during vehicle vibration.
I then installed a BLENDMOUT on my rearview mirror. Their directions are difficult to follow, but I finally figured it out and was able to successfully install the radar detector securely.
I need to especially thank
@smb5627,
@Sharbotcom, and
@heywardjr for their patience, sticking with me, and giving helpful advice.


 Congrats!