markfm
SUPPORTING MEMBER +
- Joined
- Apr 2, 2024
- Messages
- 862
- Reaction score
- 517
- Points
- 93
- My Lincoln
- '25 Nautilus Reserve II Hybrid
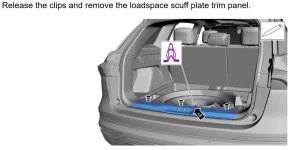
@JMAB @swindler BM300 Pro installation question - access to the positive terminal nut.
Did you end up having to pull the scuff plate trim piece, fully disassemble the cargo area plastic to reach a connection point for the positive terminal of the BM300, or does the red positive assembly disconnect while the metal cover (support for the spare) is still in place?
(Or did you use the positive bolt, next to the clamp point, in the under the hood jumper area? If so, which bolt did you attach the bm300 negative to?)
Thanks!
Last edited:

")