1979 Lincoln Mark V - Steering Coupler (aka Rag Joint) Replacement

churmsk

New member
Joined
Jun 14, 2018
Messages
4
Reaction score
0
Points
1
I have a 1979 Lincoln Mark V and the steering coupler (aka Rag Joint) has completely deteriorated. The shop manual indicates that the entire U-Joint assembly must be removed to replace the steering coupler because rivets on the OEM part/setup must be drilled out. Unfortunately, the bolt that attaches the U-Joint assembly to a steering shaft is obstructed at the firewall. The connect seems to be 1 to 2 inches inset to the firewall opening and, although I can see it, I can't seem to get to it.

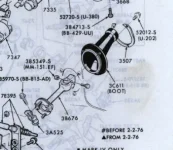
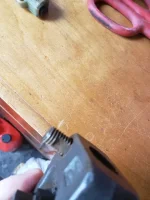
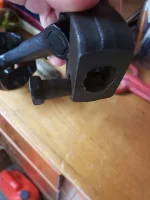
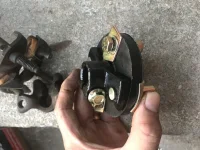
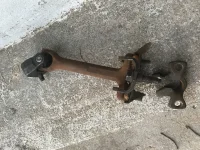
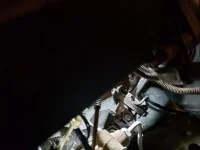
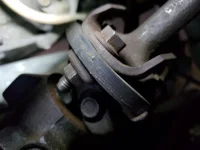
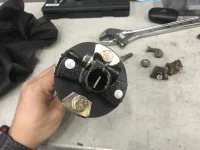
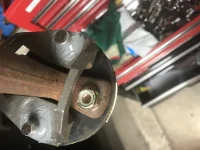
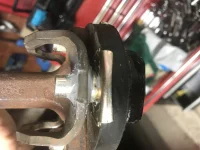
Does anyone have ideas? Image #1 shows the actual part. Image #2 provides a context to the setup.
 

Attachments

  • Actual U-Joint Assembly.webp
    Actual U-Joint Assembly.webp
    29.7 KB · Views: 22
  • Steering Assembly.webp
    Steering Assembly.webp
    25.6 KB · Views: 26
Remove the screws that hold the rubber boot to the firewall at the bottom of the steering column from the inside, then slide the boot up the shaft to access the nut.
 
I forgot to mention that the bolt will only slide out 1/2" and cannot be removed from the joint (see pic's).
 

Attachments

  • 20211002_165631.webp
    20211002_165631.webp
    61.3 KB · Views: 34
  • 20211002_165649.webp
    20211002_165649.webp
    20.8 KB · Views: 30
Just came across this post as I am faced in the same situation. How were you able to remove the shaft from the car? Did it involve removing the steering wheel and dropping the steering shaft to allow removal of the U-joint bolt? I was not able to do this as I have tilt steering which complicates the whole thing.

Any update would be really appreciated! I just ordered a brand new rag joint from Rock Auto and very anxious to get it installed.

Thanks!
______________________________
 
This is not hard to do, but does require patients as the space is limited. Both of my Mark V's have tilt wheel and you don't have to do anything w/ the column. Remove the rag joint bolts, go inside & remove the 2 screws that hold the lower boot to the firewall. Slide the boot up towards the steering wheel to access the lower shaft joint. Remove the nut & slide the bolt out from the joint (The bolt can only slide about 5/8" so it's flat spot allows the joint to slide off the column shaft). If you need more room to get to the rag joint, you can remove the wheel well liner.


michaelt62

MY Cars: https://www.youtube.com/channel/UC-Tv0kuDyQhbH-DrqF71zYQ/videos
You are a life saver, thank you so much for this, and the quick reply! I’ll give it a go and hope to get this finally fixed. Did you have any trouble installing the new coupler? And once it was attached, did you have any trouble fitting it back in place? You didn’t have to lower the steering column by any chance?
 
I forgot to add that they don't have the original urethane coupler and the bolt pattern on the aftermarket one (at least the 2 I got) were slightly off. I believe ours was 3 1/4" and the aftermarket was 3 1/8" so I had to ream the holes slightly. Also the flange on the bottom of the coupler that attaches to the steering gear shaft has a flat spot that you align with the flat spot on the shaft. As for installing the coupler, once you remove the lower shaft, you can install the coupler on the bench. It's best to mark the orientation (black marker) of the flange to the lower shaft and the lower shaft joint to the steering column shaft before removal so your steering wheel will be aligned when done. No, I didn't have to lower the steering column.

michaelt62

MY Cars: https://www.youtube.com/channel/UC-Tv0kuDyQhbH-DrqF71zYQ/videos
 
Last edited:
I forgot to add that they don't have the original urethane coupler and the bolt pattern on the aftermarket one (at least the 2 I got) were slightly off. I believe ours was 3 1/4" and the aftermarket was 3 1/8" so I had to ream the holes slightly. Also the flange on the bottom of the coupler that attaches to the steering gear shaft has a flat spot that you align with the flat spot on the shaft. As for installing the coupler, once you remove the lower shaft, you can install the coupler on the bench. It's best to mark the orientation (black marker) of the flange to the lower shaft and the lower shaft joint to the steering column shaft before removal so your steering wheel will be aligned when done. No, I didn't have to lower the steering column.

michaelt62

MY Cars: https://www.youtube.com/channel/UC-Tv0kuDyQhbH-DrqF71zYQ/videos
Thank you very much @michaelt62 for your advice. I finally got the shaft out, after so long…. 👍🏻🙂
______________________________
 

Attachments

  • 00F7C36B-D431-44F2-A07C-BE7964DFC978.webp
    00F7C36B-D431-44F2-A07C-BE7964DFC978.webp
    168.4 KB · Views: 29
  • EE987D71-9CCD-4A1E-B8EE-B3BADBD48E76.webp
    EE987D71-9CCD-4A1E-B8EE-B3BADBD48E76.webp
    522.8 KB · Views: 29
Your welcome, I never used the coupler assembly you pictured. With the flange already riveted to the coupler you lose the safety bracket that prevents total steering loss if the joint fails. You might want to check the flange to see it mates with the gear shaft before assembly.

michaelt62

MY Cars: https://www.youtube.com/channel/UC-Tv0kuDyQhbH-DrqF71zYQ/videos
Yes I understand what you mean. Looking at the aftermarket coupler assembly, it is definitely not as per original specs. There will need to be some adjustments to make it work for sure. It’s never an easy landing 😞
 

Attachments

  • 20230721_083605rs.webp
    20230721_083605rs.webp
    55.6 KB · Views: 25
  • 20230721_083439rs.webp
    20230721_083439rs.webp
    87.9 KB · Views: 22
  • 20230721_082807rs.webp
    20230721_082807rs.webp
    68.5 KB · Views: 25
  • 20230721_082742rs.webp
    20230721_082742rs.webp
    93.1 KB · Views: 24
Here you go, pic's from both of my Mark V's. The coupler kit I got came with the coupler and hardware loose (nothing attached). You have to drill out the rivets on the safety bracket and replace with bolts(use lock nuts).

michaelt62

MY Cars: https://www.youtube.com/channel/UC-Tv0kuDyQhbH-DrqF71zYQ/videos
I wished that I had consulted you before doing what I just did (please see attached pics) I cut the original two bolts as well to make the aftermarket assembly fit.

It’s a weird design, why it’s made this way. I probably have to weld the two pins to the bracket, or somehow use a tap and die to fit nuts.
 

Attachments

  • 545E6F2E-F063-4A74-A629-2DF4DA749E88.webp
    545E6F2E-F063-4A74-A629-2DF4DA749E88.webp
    114.1 KB · Views: 18
  • BEF3FE87-3167-40F8-B94E-9792E0B65DBB.webp
    BEF3FE87-3167-40F8-B94E-9792E0B65DBB.webp
    109.7 KB · Views: 17
  • 11C6A771-2D7B-4E9E-A3F8-C4538F1455B6.webp
    11C6A771-2D7B-4E9E-A3F8-C4538F1455B6.webp
    190.7 KB · Views: 19
I wished that I had consulted you before doing what I just did (please see attached pics) I cut the original two bolts as well to make the aftermarket assembly fit.

It’s a weird design, why it’s made this way. I probably have to weld the two pins to the bracket, or somehow use a tap and die to fit nuts.
Thank you (by the way) for taking the time to post those pics. What an excellent job you did. Looks good as factory built again! Where did you purchase the rag joint? Just wondering…
 
I purchased the coupler kit at a local parts store we have in western PA (Hovis Auto), It was #310004 but I don't remember who made it. All you need to do with your set up is drill out the rivets from the flange side and replace with matching bolts and lock nuts.

michaelt62

MY Cars: https://www.youtube.com/channel/UC-Tv0kuDyQhbH-DrqF71zYQ/videos
______________________________
 
I purchased the coupler kit at a local parts store we have in western PA (Hovis Auto), It was #310004 but I don't remember who made it. All you need to do with your set up is drill out the rivets from the flange side and replace with matching bolts and lock nuts.

michaelt62

MY Cars: https://www.youtube.com/channel/UC-Tv0kuDyQhbH-DrqF71zYQ/videos
Now why didn’t I think of that…. Anyways what I had done was apply an epoxy to the top to the rivets and bracket so it prevents the bracket from coming off. After all, the force is in the other two bolts where the shaft is connected to the bottom shaft bracket.
 

Attachments

  • 0D2E772B-04CF-4CA7-97ED-B27CEBAD49DB.webp
    0D2E772B-04CF-4CA7-97ED-B27CEBAD49DB.webp
    140.1 KB · Views: 21
  • 45853D02-A96A-4502-BFA0-7A909F84C5A7.webp
    45853D02-A96A-4502-BFA0-7A909F84C5A7.webp
    120.1 KB · Views: 20
Now why didn’t I think of that…. Anyways what I had done was apply an epoxy to the top to the rivets and bracket so it prevents the bracket from coming off. After all, the force is in the other two bolts where the shaft is connected to the bottom shaft bracket.
Disregard what I said about the force coming from the other two bolts, It obviously isn’t true. In your opinion, should I undo what I did and install bolts with nuts instead, or do you think I can leave as is?
 
Epoxy will not hold up if the coupler fails. If you look at my coupler you can see the fiber strands that will keep it from quick instant failure that usually happened with the original urethane one. Your pic doesn't show any fiber strands, so I'm not sure of it's composition and I would drill out the rivets to install the safety bracket securely.

michaelt62

MY Cars: https://www.youtube.com/channel/UC-Tv0kuDyQhbH-DrqF71zYQ/videos
You’re totally right, I will be drilling out the rivets and installing bolts and lock nuts as you suggested. Too bad I cut off the original bolts. Since I’m dismantling the whole aftermarket ssembly, I might as well disregard the bracket that comes with it and put back the original one that connects to the gear box since it isn’t even a 100% same fitting. Thanks again for your input on this.
 
Back
Top