Should I re-do fresh air intake gasket on 2006 Towncar even if it's not currently leaking?

I did a search for Cowl Grill Left Screw and came up with these, but not sure they areperfectly correct:
Appreciate it, Town Car. Thank you for checking for me. I'll borrow my wife's jewelry calipers and get some measurements on the one that's still in there, and if worst comes to worst, just drop a few bucks and find out the hard way. The EPDM arrives today, the air filter in a few days...it's all coming together!
 
I also saw a BUNCH of different nylon screws on Amazon, for various purposes,and probably one of those would work. But like you say, we would need the exact size--although I have found that with nylon bolts, sometimes I can make different thread sizes work, if the diameter is about right.
 
All right, here we go.

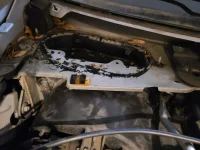
The first thing I learned from this is that there are more than four bolts to worry about, removing this tray. There are four five bolts (one missing on mine!) and two nuts. The bolts appear to be 8mm on mine, and the nuts required a 10mm mid-depth socket. Complicating matters was the discovery that the previous owner's $650 repair...consisted of his dealership, after replacing the destroyed carpets, simply squeezing out a loop of some sort of sealant over the desiccated remnants of the original foam left on the part and a handful of long-dead Indiana fallen leaves, creating a sort of curious "cookie dough" rough amalgamate of pieces of zombie foam and curiously unnatural soft and sticky black sealant. I am pretty sure this is the alien who killed Lt. Tasha Yar, living in my Town Car.

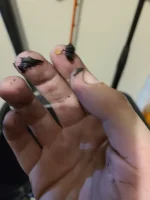
Nevertheless, I come equipped with a pair of completely professional and Motorcraft-approved alien removal tools on the ends of my wrists, and what rolling the sticky mess into a self-adhering Katamari ball of debris and yanking couldn't achieve, a little rubbing alcohol did.

1645735193106.jpeg

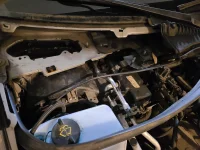
Behold, the "before" and "after."

1645735388139.jpeg1645735397480.jpeg
Now, note that cable coming out from the cowling on the right. I have no idea what it is, and it doesn't have a lot of slack, so be profoundly mindful of it when wiggling that cowl piece free! You'll see the two bolts that the nuts sit upon to the right, vertical and shiny, and the four tabs for the bolts I removed are in the recessed air intake hole.

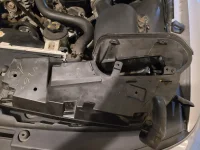
Meanwhile, here's the removed air intake section, bottoms up, after cleaning off the gunk. I note I am somewhat perplexed by the seventh apparent bolt hole in this piece -- the one next to the drain hose, with the rectangular "box" indent around it -- because this was not bolted down on my Town Car, despite an obvious bolt point on both the plastic and the metal beneath. I'd better figure out what bolt that takes, and remedy that, huh? Looks like the same 8mm bolts from the other four positions fit into it nicely, so I'll see if I can get a part number for 'em and replace all five bolts together.

1645735879284.jpeg

The EPDM gasket (currently out for delivery today) will be installed with the solid, unbroken side of the material "up" in this picture, as that's the side up against the windshield where the leaks (to my understanding) come in. I plan to attempt a loop "join" as clean as 07-Town Car-SL's, but we'll see if I manage it. I'm pretty confident the four bolts around the opening will be plenty to hold the gasket down, sealed snugly.

Since I had the part off, it was a great opportunity to clean out that drain pipe, too, but it was just fine and didn't need it. For completion's sake, I gently snaked a plastic zip-tie end up into the drain hole at the far opposite end of the cowl (under the corner by the driver's door) to check for obstructions, but it, too, is clean.

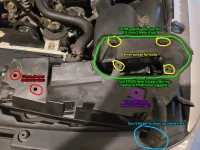
Here's a diagram. Pardon my remarkably provisional Photoshoppery.

1645737049104.png

The hardest part of this process so far has been cleaning my hands thoroughly of traces of the caulk-leaf-foam "mystery meat."

Will update with gasket installation pics, then follow up with the cabin air filter kitbash, and confirmations on the plastic retaining pins, 8mm bolts, and such.
______________________________

Help support this site so it can continue supporting you!
 
Last edited:
.......creating a sort of curious "cookie dough" rough amalgamate of pieces of zombie foam an

So you are a baker too!!!!!

Action
 
So you are a baker too!!!!!

Action
I am, actually! But I think this wheat loaf is much, much more of a success than the leaf-tar-foam souffle experiment...
1645745427146.jpeg

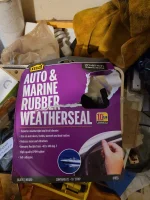
But I digress. Part II complete. The EPDM weatherstripping arrived and it is a thing of beauty. I'm sure that Ductseal or RTV would work too, but this should be much, much easier to remove than the "souffle" was.
1645745575796.jpeg

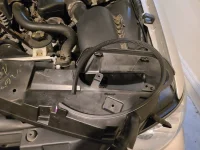
So we begin by cutting a loop that's just a little too big, with a pair of kitchen shears...
1645745628269.jpeg

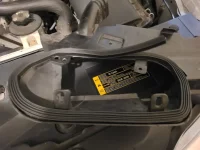
Peel it off. Stick it down. It exactly fits in the rim channel of this trim piece.
1645745674290.jpeg

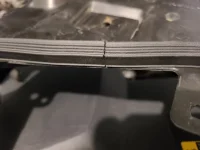
Once I had a clear idea of the join point, I clipped it down, aiming for no gap. I'm no 07-Town Car-SL, but I got it pretty close, I think.
1645746018587.webp

Now, don't panic about that seam. First, it's on the far side from where the water comes into contact with the gasket. Second, the pressure of bolting it down squashes the gasket material and presses it firmly against itself. And third, remember, this isn't a submarine door seal, it's literally just to keep water from seeping in. It doesn't have to hold up to drives into Lake Michigan or anything! It just has to keep water out, and specifically, keep water out on the opposite side from the join point. If you really feel that Ductseal, RTV, or something else would be better suited, and you want to use it, you're not making a mistake or anything -- it'll work nicely! -- but this is a little less messy, and particularly easy to remove, without making...more tar-leaf-foam souffle. I didn't like that stuff. At all.

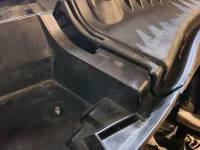
So, okay. EPDM "bumper" on, it's time to reinstall your intake mouth plastic piece. Be mindful of that cable, and start by carefully tucking the tab toward the car's centerline under the other trim piece there:
1645746332732.webp

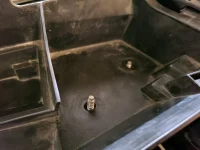
I then just lowered the piece down directly onto those two bolts, and it was already nicely lined up.
1645746367314.webp

...well, nicely lined up on this side, at least. That EPDM gasket you just made is pushing up against the other side, and yes indeed, the bolt holes and tabs on the intake itself will resist lining up...
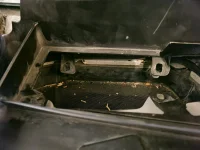
1645746422667.webp

...this is normal. You're fighting the natural tensile strength of that gasket, after all. So, I started with the two nuts on those vertical bolts. I think they could benefit from rubber gaskets too, but I don't have any right now. I'll replace them when I replace the bolts and add a bolt to that empty spot, later.
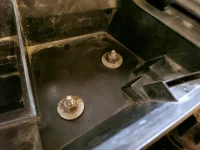
1645746520896.webp

Those bolts, by the way, look an awful lot like M4.2-1.41 16mm sheet metal self-tapping screws, and I'm gonna eyeball that as a 12mm washer on it.
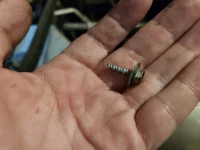
1645746659405.webp

So, I started with the right lower bolt, to help hold the intake plastic mouth down...
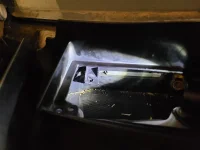
1645746710075.webp

...then slid the bolt in diagonally to the opposite corner, touched the hole, then used a screwdriver-style straight driver to lever it "into line" and tighten it down. Right lower, left upper, right upper, left lower, in that order. It worked.
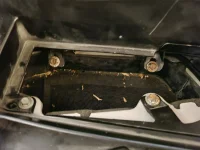
1645746777494.webp

..and then, it was an easy job to replace the upper grill and the rubber weather strip.
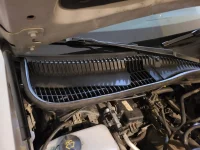
1645746820720.webp

Total time: about an hour, not counting limitless juvenile jokes that my very patient wife endured for my sake and posting here. Total tools included a straight socket driver, 8mm and 10mm mid-depth sockets, a flashlight and a pair of kitchen shears.
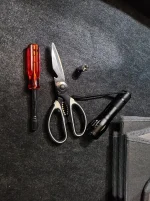
1645746905713.webp

Part III, with the air filter installation, is coming as soon as the filter arrives! Hope this is helpful to some of you. Again, RTV, Ductseal, and other solutions are also just fine -- this is just what I used, and I believe any of these will do the job nicely.
 
Rancourt's install of the EPDM was great, and fun to read!
This discussion really has me on the fence about doing the 'before it leaks' repair to my car, it is logical but...
My 2009 Lincoln Town Car is a very low mileage garage queen, driven enough and maintained to keep things moving.

Back to the gasket. A few months ago, after reading about the potential water leak on this forum, I removed the cowl to inspect the foam gasket area and darned if it doesn't look in great shape, the foam is still fairly pliable. Although the cowl area was a bit dirty I decided to just do a general cleaning with Formula 303 and button it back up. As I live in AZ and the car is garaged plus it doesn't rain that much, probably the car gets more water from car washes than weather. I'm gonna roll the dice and wait, keeping my eye on things. (Maybe I'll buy a roll of EPDM just in case I get energetic.)
______________________________

Help support this site so it can continue supporting you!
 
Last edited:
KWIC if you do decide to use the gasket, use rubbing alcohol to clean the surface. Normal 303 contains silicone which will prevent the seal from sticking properly. In your case I would say unless you drive the car in the rain you really shouldn't have to worry about it. I live in Canada and we have rain, snow, sleet, hail, ice, etc. so mine needs to be sealed even though my car was a low mileage garage queen until I got it. It's still a garage queen most of the time now though LOL.
 
KWIC if you do decide to use the gasket, use rubbing alcohol to clean the surface. Normal 303 contains silicone which will prevent the seal from sticking properly. In your case I would say unless you drive the car in the rain you really shouldn't have to worry about it. I live in Canada and we have rain, snow, sleet, hail, ice, etc. so mine needs to be sealed even though my car was a low mileage garage queen until I got it. It's still a garage queen most of the time now though LOL.
Aye, thanks for the reminder, I'll do that!
 
Thanks -- I used the gasket molding that 07-Town Car-SL recommended. I don't think my work is as good as all of yours in the pictures, but I think I did the job.

The previous owner had used some type of goo in the same spot, but the top cowl cover lifted off very easily, which makes me think the old goo was not totally sealed at the top. There oak leaves on top of the fresh air vent, but they were perfectly dry, and I vacuumed out the top of the vent.

I scraped off all the old goo around the fresh air intake metal and on the cowling top, cleaned the surfaces with alcohol, let them dry, and used emblem adhesive to keep the gasket in place on top and bottom and glued the edges together where they met towards the front of the car.

Unfortunately, now ALL OF A SUDDEN, there is a moldy smell coming from the AC.... I had this problem in my last car (2007 Town Car), which likely WAS due to the fresh air intake valve not having been sealed properly. But that car had other issues, so I sold it.

On the current car, maybe the evaporator coil in the has mold on it? Of maybe the drain plug is clogged at the bottom of the evaporator coil?

What is curious to me is how fast the moldy smell started. I've only had the car about a week. There was NO moldy smell from the AC when I bought the car... We have had hardly any rain this week, and, as mentioned, the old owner did have some kind of goo to impede water entering the fresh air intake (even though it wasn't perfectly sealed).

What I don't understand is why all of sudden I am smelling mold.... BTW, I am allergic and extremely sensitive to mold, so I don't believe that the smell was there last week... Seems to have just started.

Note that there are no leaks that I see on the current car. Front and Rear Passenger footwells are fine. No rust on seat rail slider bottoms..

Any ideas?

Is the default to remove the whole evaporator coil, clean it, and put it back? That seems like a pretty big job...

Any insights would be appreciated.

Thanks!
______________________________

Help support this site so it can continue supporting you!
 
Last edited:
Unfortunately, now ALL OF A SUDDEN, there is a moldy smell coming from the AC.... [...] Any ideas?
Oooh. Yeah, that's got to be a bummer, TcLincoln2007. My immediate thought is actually that you might have knocked something loose that was already growing in there, with the work you did. I'd also check the HVAC drain point for clogs, which (IIRC) should be exactly where it is on the corresponding Crown Vic: actually is not where I thought, apparently. I stand corrected and have edited this answer accordingly. There's a drain on the evaporator housing, close to the firewall on the bottom nearest the engine, according to notes. It is not where it is, on the corresponding Crown Vic or Grand Marquis!

I've heard about folks spraying disinfectant through the intake with the A/C running full blast, but I've never done this, myself, so I'd prefer not to talk from my own lack-of-experience. Maybe someone here with more experience can offer suggestions on this -- I'm told it's the primary solution to "mold in the system" and it's "easy enough for anyone to manage," but having never needed it, thus never actually done it, I'm going to simply ask for wiser forum folks to step up with suggestions here.
 
Last edited:
Thanks. Interesting Idea. I was also thinking maybe the previous owner sprayed something in there to stabilize the mold for a while.. In South Florida, Mold is a constant issue.... Good thing I like it hot. I never ruse the AC anyway. in the house or in the car. I just open the windows and run fans. I didn't use the AC on my 2007 Town Car for 5 years due to the mold smell, and I didn't have the money to re-do the AC Evaporator coil.... The only real problem was the lack of front windshield defrost. But I bought clip on fans for that. Where there's a will, there's a way. I guess.
 
Just to be clear, when you use that weatherstrip that I linked to, there is no need for any additional adhesive or sealant. The weatherstrip is sticky on the back and once installed and compressed it is watertight.
 
Thanks. For some reason, the adhesive side wasn't sticking to the plastic surface, even though I cleaned the surface thoroughly, then wiped it with alcohol and let it dry... So I needed something to hold it in place while I pressed down. The emblem adhesive may have been overkill, but I figured better safe than sorry. (I wanted to glue the molding to the plastic cover first, so that I could keep it aligned, since there are guide ridges on the cover.) Thanks
______________________________

Help support this site so it can continue supporting you!
 
Last edited:
Thanks for the write-up rancourt, I am glad I procrastinated on this job as I was going to use goo. Think I will order this gasket instead.

As to the question of if you should fix this early rather than late...
I say do it. We are talking $10 here and probabally an hour of time tops. Even if you park it in the garage and live in AZ, why risk getting caught in a downpour and having water backup into the car? (reminds me of the Simpsons episode where their foundation needs an $8k repair due to water leakage, and Homer rejects the guy's offer of a 50 cent washer to prevent the recurrence of the problem)
 
Thanks. For some reason, the adhesive side wasn't sticking to the plastic surface, even though I cleaned the surface thoroughly, then wiped it with alcohol and let it dry...
Hmmm. Very strange -- the stuff I bought glued down easily and quite powerfully, just as 07-Town Car-SL reported. (ASIN B000I1QHA8.) May I ask what gasket material you bought? (Maybe this info will help someone else with their selection, in the future.)
 
(Per request, I've moved the cabin air filter writeup to a new thread)
 
Last edited:
Can you move the cabin air filter to it's own thread? It doesn't belong here and will get more views if you create a new topic.
 
Back
Top