Distributor Stuck in Block

PotatoTsunami

New member
Joined
Oct 22, 2024
Messages
23
Reaction score
8
Points
3
Location
Boston Area
My Lincoln
1978 Mark V Givenchy
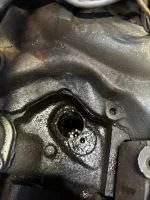
Ahh, the wonderful world of galvanic corrosion...

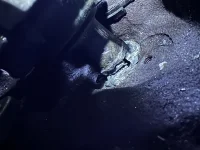
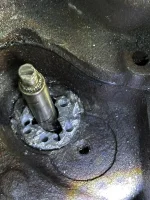
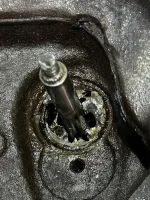
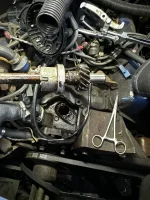
Needed to pull the disty on my 78' Mark V 400ci to replace one of the spring clamps and to check/set timing. Little did I know this SOB is absolutely seized to the block. I've tried every trick I know to get this thing freed up; leverage, slide hammer, penetrants, air hammer. Nothing has worked.

Looking for any advice before I pull the pan and try to get her from the bottom.

Thanks
 
There is little to no access to the distributor from the bottom.
If you did remove the pan. You would also have to remove the oil pump. Then only a small part of the distributor shaft would be accessible.

It is not the shaft, it is the distributor body that is stuck.
The only thing you have not mentioned is heat.
You can use heat from a propane torch or similar source to get things shaken up. Then add more penetrant oil. And a lot of it. As the metal pieces cool down from being heated up they will contract, with the idea that the contraction will suck some of the oil into the space between the distributor body and engine block.
May need to be done multiple times.
And continuously get penetrant oil to that area. Hot cold or in between.

Do remove items near by so they do not get heated up.
Coil, rubber vacuum lines and other items.

It is mostly time that allows the distributor to give up without damage. The only time I damaged a stuck distributor, was when I used a clamp on the body. Then attached a pipe to move (twist) the body. The upper body broke and there was still a piece of the lower body stuck in the hole of the block. After removing as much as possible, including the shaft. I plugged the hole as best as possible and drilled out the rest of the lower body of the distributor. I believe I had a dozen or so holes before most of out came out.

Does the distributor body turn any?
If yes, you are now fighting varnish.

I now use very thin coat of anti-seize on that lower part of the distributor anytime I remove the distributor in any hobby car.

Good luck

Action
I have already made the mistake of snapping the body by the flange. I have a new unit ready to go sitting next to my jar of anti-seize.

I started the project by filling the "well" with some PB for about a week and letting it sit, hoping to get lucky. No movement what so ever.

I wasn't sure if heat would be ok in that area. I was nervous about messing up the intake manifold gasket...although a small price to pay to get this thing out.
 
Removing the intake would be more effective than coming from the bottom.
The factory intake is cast iron. Heating it won't damage it.
Will damage the paint. Might damage the gasket.
Being careful with the heat and cooling cycles may result in success.

If you go this path, the result will look purdy after the new Corporate Blue paint is applied.

If the upper part of the distributor body has already been broken off, then cut the body stub off as close to the intake as possible, as carefully as possible.
Then drill baby drill!
I would seal up the opening through the center of the distributor with a mass of silicone. Let that cure, then start a careful drilling sequence around the soft metal of the distributor. And just shy of the intake.

Good luck with this 385 engine.

Action
______________________________

Help support this site so it can continue supporting you!
 
Last edited:
Removing the intake would be more effective than coming from the bottom.
The factory intake is cast iron. Heating it won't damage it.
Will damage the paint. Might damage the gasket.
Being careful with the heat and cooling cycles may result in success.

If you go this path, the result will look purdy after the new Corporate Blue paint is applied.

If the upper part of the distributor body has already been broken off, then cut the body stub off as close to the intake as possible, as carefully as possible.
Then drill baby drill!
I would seal up the opening through the center of the distributor with a mass of silicone. Let that cure, then start a careful drilling sequence around the soft metal of the distributor. And just shy of the intake.

Good luck with this 385 engine.

Action
Action, thanks for your advice. I've been trying the heat method for a few days with no luck. Looks like I'll have to go the surgery route.
 
post pictures

Action
 
Last edited:
Well, here's one that shows the disaster I'm dealing with...
 

Attachments

  • LINC DISTY.webp
    LINC DISTY.webp
    213.9 KB · Views: 1
I feel your pain.

I have a corroded thermostat housing on my '70 Mark III. The retaining bolts broke off and the housing is still attached and does not leak.
I am avoiding the problem because I will have to drill out the bolts when I remove the thermostat housing.
(The PO did a poor job at maintaining the cooling system)

I have a new housing and an intake from a 1972 Mark IV.
The car is in Michigan and the cast iron (heavy) intake is in Arizona. Plus it is for a 72 and not exactly like the 70. But it was free.

Good luck my friend. I know you have a lot to deal with in the extraction process.
All I can say is the finished job will give a lot of satisfaction.
Or you can open your bank account, have the vehicle towed and write the check. Not a direction that I would take, but I am rather cheap that way.

Action
______________________________

Help support this site so it can continue supporting you!
 
I've been lucky so far with most of the things I've had to R&R, no broken or seized bolts. This is the first real challenge I've faced on a car that sat in a field for 30 years in the North East.

I do like a good challenge and I try to be as frugal when it comes to my hobbies.

Yikes, I'm sure that would cost a pretty penny to get that intake to where it would need to go!

I'll post more pics as I chip away at this project.

I appreciate your advice and support.
 
I go to Michigan every year. I have family there.
In the last 10 years I have always flown there and my Mark III is my driver when I get there.
There is a chance at some point that I may drive there. If so that intake is coming with me.

Action
 
Got it! Next time, just tell me to stop being a wimp and use your recommendation! 🤣

Not as much cursing as I anticipated.

It was the damn o-rings and not the dissimilar metals...go figure.

Now to find the other half of a steel bushing that split from my previous attempts.
 

Attachments

  • IMG_5496.webp
    IMG_5496.webp
    394 KB · Views: 3
  • IMG_5500.webp
    IMG_5500.webp
    532.5 KB · Views: 2
  • IMG_5502.webp
    IMG_5502.webp
    296.1 KB · Views: 3
  • IMG_5503.webp
    IMG_5503.webp
    263.5 KB · Views: 3
The hole down inside is the diameter of the distributor shaft.

Getting a magnet on a stick that will fit into that hole would be good.

Was the distributor shaft free? (and only the housing stuck)
The 3 to 4 inch hose in the top of the last picture. What's that about?

Action
______________________________

Help support this site so it can continue supporting you!
 
I poked around with a magnet last night but was getting late, I'll go fishing some more after work today.

The shaft was free and was only the housing stuck. The o-rings were pretty well hardened in place. Once I chipped some of the rings out, the housing started to move.

That's to my mini shop vac. I was using that to suck up the chips from drilling.
 
+1 to the shop vac! Smart move.

The magnet will not work on "housing" pieces. I would be concerned if I found any metal below the opening.
If there are any, flushing would be a potential solution versus removing the oil pan. Drain oil, then pour a cleaner solution into that opening and keep track of what comes out the oil pan drain.

Interesting about the hardened O ring.

My recommendation for installing the new distributor. Lube the new O ring. (any rubber/vinyl/leather treatment will work) And use a very very light coating of anti-seize on the bottom of the distributor base that is in the block.

You are doing awesome work!

Action
 
Sometime I do have good ideas! Lol

I planned on doing a flush either way, I’m sure the vac didn’t work 100%. Better safe than sorry.

Very concerned though about the other half of this bushing. It’s the one that sits against the bottom of the housing stem. It is steel, so a mag will pick it up. It’s just finding that sucker…

Good idea with conditioning the o ring prior to install.
 
Update - found the other half of the bushing.

My buddy let me borrow his borescope with an articulating head. Was able to work it down past the oil pump and bingo, there it was. Kudos to my wife for watching the camera and guiding me as I went in through the drain port to grab that sucker.

New distys in and car is running - any advice on timing? I cant find reliable information on how to properly set timing.
______________________________

Help support this site so it can continue supporting you!
 
There was a sticker on the left valve cover with base ignition timing data.

Or you could set timing on a warmed up engine to a vacuum gauge.
Connect vacuum gauge to intake.
Connect timing light.
Remove and plug vacuum lines to distributor.
With engine warmed up, advance distributor to highest vacuum reading.
Then back off (retard) timing until vacuum drops by 1/2 to 1 inch. Note location of timing mark.

Reconnect everything and test drive for pinging or spark knock. If there is any retard timing in 2 degree increments.

Action
 
Back
Top