1. Move your seat all the way back
2. Disconnect Battery
3. Remove lower cover under the dash that covers the pedals up. I order to do this you need to remove the three black push pins that hold the cover to the bottom of the dash. Then draw the cover down and forward to dislodge it from the retaining clip at the firewall side. DO NOT pull to far forward because you need to remove the courtesy light from the cover first.
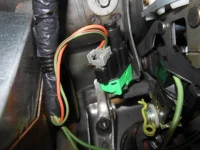
4. Unhook the brake light and cruise control wiring from their connectors.
5. Remove the cruise control switch (upper left switch in the pic)from the pedal assembly. To do this you simple grab the switch and turn it about 45 degrees COUNTER CLOCKWISE.
6. Remove the yellow spring clip from the pedal stud.
7. Slide the washer off from the pedal stud that you just removed the clip from. Now you can apply just a little bit of pressure to the brake pedal to release the rod from the brake booster and the brake light switch from the pedal stud.
8. Now we need to remove the drive cable from the brake pedal. This can be one of the trickiest parts of the whole deal. Look closely at the cable end nearest the pedal. There are two small sides that are solid and two larger ones that are not. If you squeeze the solid ones, they are supposed to release the open ones...yeah right, so I used a small screwdriver to help slide the locking edge over its rim. BE CAREFUL not to pry too hard. It will come off you just have to hold your tongue right!
9. Remove the 10mm headed bolt that is located straight up towards the top of the dash. Next remove the four 14mm nuts that are on the studs coming through the firewall.
10. Now go outside under the hood and pull the master cylinder and brake booster forward just enough so that the studs are on the engine side of the firewall. You will move the master cylinder assembly over to the driver's side just enough so that the studs can't slide back through.
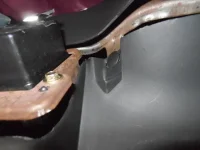
There is a black piece of plastic that is a spacer in between the pedal bracket and the firewall. It may fall down or out while removing the pedals. We will address that on instal. So for now just pull it out of the way when it is necessary.
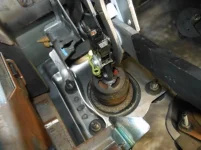
11. Now for the next tricky part, removing the pedals. The bracket the holds the under dash cover needs to be bent froward so that it is out of the way. The pedal assembly is then twisted clockwise and drawn out pedal first and then the top. It is tight, it does not want to fit out of here but if you take your time it will slide right out.
12. Now for the actual repair. Set the pedal on the bench and remove the two T-20 torx bolts from the plastic housing.
13. Next you have to GENTLY pry the cover off by releasing the 6 tabs and prying upward at the same time. Two pocket screw drivers work best.
14. SAFETY GLASSES ARE A MUST!!!! CAREFULLY remove just enough of the swedge (metal) above the washer so that the washer can be removed. DO NOT grind the snot out of it. Just grind enough so that you can see that the washer surface has been touched. I use a die grinder with a green (01396) 3M roloc disc on it.
15. Once the swedge has been removed from above the washer turn the gear down so that it is as far away from the washer as it can be.
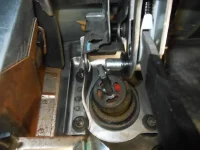
16. Mount the pedal assembly in a vise as shown or have someone hold it still so you can knock the washer off with a hammer and chisel.
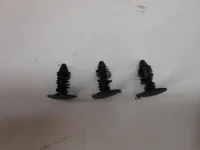
17. Remove the old gear.
18. Apply grease to the threads in the pedal. Your favorite brand is fine. We use Sil glyde.
19. Thread your new gear onto the shaft. Apply some grease to the outside threads on the new gear.
20. Instal the provided cap washer by setting it on top of the end of the shaft and lightly hammering it on.
21. Now you need to line up the pedal so that when we instal it we are synched with the gas pedal distance wise. look at the right hand side of your pedal assembly, there is a mark / notch on the side right above the slide for the pedal. You need to adjust your gear so that the pedal is exactly lined up with this mark. You do this by simply threading the gear.
22. Now we can re-instal the cover. Be sure to add some grease to the worm gear as well. Do not over tighten the bolts.
23. Back together, first the pedal assembly goes back in place. The black separator piece must go in between the pedal and the firewall BEFORE you slide the master cylinder studs back through. The trick I have learned is to set the pedals in, set the plastic piece in, then instal the 10mm bolt in the top of the pedals to hold everything in place. You should then be able to line up the pedal assembly and the plastic piece so they master cylinder studs will slide right through them both.
24. Once the studs are through the pedals take the 10mm bolt back loose and instal the four 14mm nuts and tighten them. Now re tighten the 10mm bolt.
25. We now must set the gas pedal to match the brake pedal. Re - connect the battery and set the gas pedal as low as it can go.
26. You now pick up at step 8 going backwards for the rest of the instal.