Adding a cabin air filter to my 2007 Town Car Signature Limited!

rancourt

Active member
Joined
Jan 14, 2022
Messages
96
Reaction score
153
Points
33
Okay. As promised, Part III of the cabin air intake saga that began in Parts I and II elsethread -- the installation of the cabin air filter. It's really simple. So, having heard a rumor that a contemporary Jeep Grand Cherokee's cabin air filter fit nicely, I picked up a UAC FI 1062C cabin air filter, trimmed a little off of the tapered end, and slotted it into the "box" area over the cabin air intake. I used a little painter's blue masking tape to hold together the end I cut, but it didn't prove necessary at all -- these filters chop neatly and stay together after chopping! (Just take care to remember which direction air's meant to flow through the filter, if you cut away the indicator...)

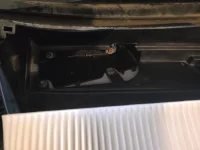
So, since the entire intake area was on the left side, and only filled about half the total space:
1646166947424.webp

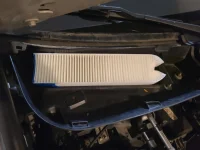
...I cut myself a little extra length, and used it to fold in the corners at the far side, creating an easy-remove "notch" in the filter naturally, where it's not actually needed to block airflow, far from the intake itself.
1646166960376.webp

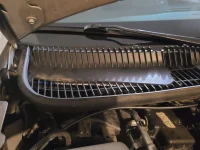
I could have trimmed a couple more ribs for a perfectly flush fit, but again, that "notch" will make it easier to remove one day, at no loss of filtration, since the area it needed to cover was all toward the left. The filter fits perfectly under the cover, and between the gasket and the filter, I note that I have improved airflow through the dash vents, which surprised me! I'm guessing that, in addition to water getting in through the gap there, the imperfect seal wastes a little of the pull force of the intake fans. My wife and I both noticed a clear difference, post-install -- two bars on the fan was now as powerful as four bars used to be! Your mileage, of course, may vary, and I'm not sure that's a normal gain -- maybe more a sign that my own intake was leaking air as well as water -- but it surprised us.
1646166970466.webp

Really, really glad I could share this process with all of you, and hope it helps someone in the future!
 
Okay. As promised, Part III of the cabin air intake saga that began in Parts I and II elsethread -- the installation of the cabin air filter. It's really simple. So, having heard a rumor that a contemporary Jeep Grand Cherokee's cabin air filter fit nicely, I picked up a UAC FI 1062C cabin air filter, trimmed a little off of the tapered end, and slotted it into the "box" area over the cabin air intake. I used a little painter's blue masking tape to hold together the end I cut, but it didn't prove necessary at all -- these filters chop neatly and stay together after chopping! (Just take care to remember which direction air's meant to flow through the filter, if you cut away the indicator...)

So, since the entire intake area was on the left side, and only filled about half the total space:

View attachment 12783

...I cut myself a little extra length, and used it to fold in the corners at the far side, creating an easy-remove "notch" in the filter naturally, where it's not actually needed to block airflow, far from the intake itself.

View attachment 12784

I could have trimmed a couple more ribs for a perfectly flush fit, but again, that "notch" will make it easier to remove one day, at no loss of filtration, since the area it needed to cover was all toward the left. The filter fits perfectly under the cover, and between the gasket and the filter, I note that I have improved airflow through the dash vents, which surprised me! I'm guessing that, in addition to water getting in through the gap there, the imperfect seal wastes a little of the pull force of the intake fans. My wife and I both noticed a clear difference, post-install -- two bars on the fan was now as powerful as four bars used to be! Your mileage, of course, may vary, and I'm not sure that's a normal gain -- maybe more a sign that my own intake was leaking air as well as water -- but it surprised us.

View attachment 12785

Really, really glad I could share this process with all of you, and hope it helps someone in the future!
Looks real good 👍 nice job and nice write up for future reference.
 
Nice job, good write up, as usual. I'll be curious with the down-the-road results, as this filter is exposed to the elements. Rain, car washes, etc. will have moisture blowing around under the cowling. Black mold can be nasty. Most cabin filters are well concealed within the cabin and behind the firewall. I hope your results are as you would expect, so I'm following.

I'd like to do this mod, as my wife says my "old car" doesn't smell as fresh as hers. Age may not have anything to do with the odors, the more likely reason is my intake of tasty burritos! 😋
 
I hope this works out. For now, I occasionally unload half a can of Lysol spray to deal with the funky air.
 
I've been using this cabin filter mod for some years now. No problem in rain and so on.
The only thing I wonder is if it has any negative effect for the air condition funktion.
 
I've been using this cabin filter mod for some years now. No problem in rain and so on.
The only thing I wonder is if it has any negative effect for the air condition funktion.
Thanks for the feedback, interesting. In my locale, it gets plenty hot and humid through the summer and usually leads to black mold and mildew buildup for things in confined spaces. Extra dampness and this will exacerbate the situation.

You also bring up an excellent point, airflow. Dry filter material flows air much more efficiently than damp or wet media. Gonna give this more thought. :unsure:
 
Thanks for the kind words, folks -- even the skeptical ones.

I also think he just installed a 'Mold Maker & Catcher'.

It's certainly possible, of course -- but granting that I'm speaking in terms of speculation here, and thus, simply guessing (and I acknowledge this), here are my thoughts on the matter. What I hope I've done is created an early warning system through which mold will become visible on the filter and not instead build up inside the system where it's much, much harder to reliably reach and clean. Given that the factory solution prior to adding the filter was a bit of, essentially, screen door mesh over a wide-open hole under the cowl, I can only presume that mold screening was never much of a priority in this design, and adding a weak screening system with a visual signal that something has started to grow on it -- provided I regularly check it (which I do) -- is a step in the right direction.

The filter's exposure to the elements also means it's regularly exposed to sun, too. That plastic shield on the lid covering it (sort of) deflects direct rain splashes, yes, but it doesn't really provide consistent, effective shade or water resistance. I just take heart in the knowledge that there's a (weak) barrier between my air intake and the pricier interior parts of the system, and that it might help, or at least tip me off that a situation is unfolding, if I regularly check it.

It also gives me an easily-removable "mold honeycomb" to spray down with disinfectant, then bake in direct sun, to kill and remove the mold...or just trash and replace if it looks dodgy. This strikes me as a useful thing. Again, I can't stop mold from existing, but mold that stopped at the filter is mold that isn't now in places I can't reach.

Whether this solution proves at all viable remains to be seen, but I am, as the song says, just a soul whose intentions are good, and who has done a small amount of due diligence and put thought into this. (Useful, correctly-framed thought? Who knows!)

I hear your concerns, loud and clear, and I'm not convinced this is necessary for everyone, or useful for everyone. But I thought it was worth a try.

I can’t quite figure out what he did to increase the fan air flow. I’m really interested in that.

My guess -- and I'd like to note that this is merely a guess, and so I am speaking from my posterior, so to speak -- is that the EPDM gasket in parts I and II of this operation did most of the work toward that, and my airflow was simply so bad before that the regularly-anemic blower pressure is a huge step up from the state of the car as acquired with its rotten seal there. I'm guessing that the cavernous air vent network requires exponentially greater pressure to blow forcefully, and given so many points of failure for air pressure leak, fixing any one of them might have a dramatic effect on perception. Before we imagine that I went from 90% to 180% of stock airflow force, let us entertain the possibility that I merely went from 40% to 80%, and the disappointing, anemic airflow you're experiencing in your TCs would itself still be a noticeable step up for me.

I can only say that it helped me...which also tells me that airflow around the intake was a problem, in my car. This may just be a case of "my car's intake was really a mess," which, to judge from the photos I shared....is my own leading theory.

Your mileage may, obviously, vary greatly. I offer my experiences only in the spirit of sharing lessons learned, and openly note that I am but an egg, and no expert...just a guy willing to wrench his Town Car and tell you if it broke anything!
 
Last edited:
I have/had some ac problem when its about 30 C (86 F) and driving on the highway with speed above 110 km/h (68 m/h).
When the workshop checked my a/c they thought it sound strange as it blowed really cool air, so it should not be any problem even if its really warm. And they also said it can not be the cabin filter as Town Car has no cabin filter...
______________________________

Help support this site so it can continue supporting you!
 
Back
Top